Thursday 11 October 2012

Application file extensions


Dynamics AX uses a lot of file extensions, but luckily, there is a logic to them, so you can easily identify their purpose.
Most of these files are located in the application folder (AX 2009):
C:\Program Files\Microsoft Dynamics AX\50\Application\Appl\[your_application]
The extensions have 3 characters:
The first character indicates the owner of the file:
a: application
k: kernel
The second character indicates the content of the file:
l: label
o: object
t: text
d: developer documentation
h: help
And the third character indicates the type of file:
d: data
i: index
c: cache
t: temporary
Using this logic, we can easily name all file extensions, and understand their purpose.
In the application folder:
ALD extension: Application Label Data files
These files contain the labels and label comments for a specific language of a label file.
ALC extension: Application Label Cache files
These files contain the application label cache. These files can be deleted when the AOS is stopped.
ALI extension: Application Label Index files
The .ali files contain an index to the .ald files. These files can be deleted when the AOS is stopped.
ALT extension: Application Label Temporary files
These files contain new labels before they are committed to the .ald file.
AOI extension: Application Object Index file
The AOI file contains an index to the AOD files. You can delete this file when the AOS is stopped. Be sure to delete this when you have copied layers from one AX installation to an other.
ADD extension: Application Developer Documentation Data files
These files contain the documentation that is found under the Application Developer Documentation node. These files are localized, just like label files.
ADI extension: Application Developer Documentation Index files
This is the index to the ADD file.
AHD extension: Application Help Data files
The AHD file contains the documentation aimed at the end user. In the AOT, this is found in the “Application Documentation” node.
AHI extension: Application Help Index files
This is the index to the AHD file.
AOD extension: Application Object Data file
This is the ‘AX layer file’, each of these files represents one layer.
KHD extension: Kernel Help Documentation files
These files contain the kernel help documentation you can find in the AOT in the tree node System Documentation.
KHI extension: Kernel Help Index files
The KHI file is the index to the Kernel Help file.
Located in Server/bin:
KTD extension: Kernel Text Data file
This file contains system text strings. These are used in the interface of AX and for system messages.
KTI extension: Kernel Text Index file
This is the index to the KTD file.
Client side (not following the naming logic):
AUC extension: Application Unicode Object Cache file (as from AX 4.0)
This file is created on the client side, and is used to improve performance by caching AX objects. When you are in the situation where an AX client keeps using ‘old code’, or where something works on one client and not on the other, removing the AUC file might be the solution.
You can find this file in the directory C:\Documents and Settings\[USERNAME]\Local Settings\Application Data for xp, or C:\Users\USERNAME\AppData\Local for vista.
More information about object caching on Axaptapedia
AOC extension: Axapta Object Cache file (Untill Axapta 3)
This is the ‘old’ version of the AUC file but serves the same purpose.
Wednesday 26 September 2012

How to add a image to a form in Ax 2009

Hi Friends,

Today we are going to add a image to form below the grid to diplay the related image.


In class declaration of your form declare a FormWindowControl (variable name - itemImage) and add a method on form of to load the images,
the code for form is as follows


void loadImage()
{
    Image img;
    ;

    //where FormDataSource is the datasource holding image
    if (FormDataSource.Image)
    {
        img = new Image();
        img.setData(FormDataSource.Image);
        itemImage.image(img);
    }
    else
    {
        itemImage.image(null);
    }
}

overirde the init method of the form as shown below:-

public void init()
{
    ;

    super();
    itemImage = element.design().control(control::Window);
}


Take a button under menuitem buton and name it as "save as"
to save the image which u have created  take a new method on form and write the following code

void saveImage()
{
    Image    img;
    Filename name;
    str      type;
    #File
    ;

    img = new Image();

    type = '.'+strlwr(enum2value(img.saveType()));

    name = WinAPI::getOpenFileName(element.hWnd(), [WinAPI::fileType(type),#AllFilesName+type], '', '');

    if (name)
    {
        ttsbegin;
        img.loadImage(name);
        
        //where FormDataSource is the datasource holding image
         FormDataSource.Image = img.getData();
         FormDataSource.write();
        ttscommit;
    }
}


Now, override the active method of formdatasource and place the code as shown below:-

public int active()
{
    int ret;

    ret = super();

    element.loadImage();

    return ret;
}

Also, override the clicked method of "Save as" button created above and place the code as shown below:-

void clicked()
{
    super();
    element.saveImage();
}

Final step:- Add a window control on the tabpage\group or the place where u want to display the image.

Thanks.

Wednesday 5 September 2012

Setup Alerts in Dynamics Ax

This article describes how to set up Business Alerts in Microsoft Dynamics AX 4.0. This article also describes how to set the e-mail address from which Business Alert e-mail messages are sent.

MORE INFORMATION

Configure a user account to receive alerts

To configure a user account to receive alerts, follow these steps:
1. In the Navigation Pane, click Administration, and then click Users.
2. Select a user, and then click User Options.
3. Verify that the e-mail address where you want the user to receive alerts is in the E-mail field.
4. In the Receive alerts every (minutes) box, type 1.
5. In the Pop-up link destination list, click To alert.
6. In the Send alert as e-mail message list, click Define on each alert rule.
7. In the Show pop-ups list, click Define on each alert rule, and then click Apply.
8. Close the Options window.

Add the "E-mail distributor batch" job

The "E-mail distributor batch" job is the batch job that monitors and sends e-mail messages. To add the "E-mail distributor" batch job, follow these steps:
1. In the Navigation Pane, click Administration, expand Periodic, expand E-mail processing, and then click Batch.
2. In the "E-mail distributor batch" window, click Recurrence.
3. In the Recurrence window, click No end date.
4. Click Minutes.
5. In the Count box, type 1, and then click OK.
6. In the "E-mail distributor batch" window, click to select the Batch processing check box, and then click OK.Note You receive an Infolog message that resembles the following message:
Information: The E-mail distributor batch job is added to the batch queue.
7. Click Close to close the Infolog dialog box.
8. On the Tools menu, click Development tools, and then click Application Hierarchy Tree.
9. Expand Forms, and then double-click Tutorial_EventProcessor.
10. On the Tutorial_EventProcessor form, click Start, and then verify that the status is In waiting.

Set up a new alert rule

Alert rules define when alerts are sent and how they are received. To set up a new alert rule, follow these steps:
1. In the Navigation Pane, click General ledger, and then click Chart of accounts.
2. On the Overview tab, right-click a cell in the Account name column, and then click Create alert rule.
3. In the Alert me when area, select the field that you want to monitor with this alert rule in the Field list. For example, select Account name.
4. In the Event list, select the event that you want to trigger an alert. For example, select has changed.
5. In the Alert me for area, select the All records in Ledger chart of accounts option.
6. In the Alert me until area, select the No end date option.
7. In the Alert who area, select the user account that you want to receive this alert in the User ID list.
8. In the Also alert me by area, click to select the Show pop-ups check box.
9. Click to select the Send e-mail check box, and then click OK.
10. Close the "Manage alert rules" window.

Test the alert

To test the alert that you have set up, follow these steps:
1. In the Navigation Pane, click General ledger, and then click Chart of accounts.
2. On the Overview tab, change the name of the account for which you set up a new alert.
3. In the Navigation Pane, click Administration, click Periodic, click E-mail processing, and then click E-mail sending status.
4. The "E-mail sending status" window shows e-mail alerts that have been sent.

Set the e-mail address from which alerts are sent

You can set the e-mail address from which alerts are sent by selecting an e-mail template. To do this, follow these steps:
1. In the Navigation Pane, click Basic, click Alerts, and then click Alert parameters.
2. In the E-mail ID list, select the e-mail template from which you want e-mail alerts to be sent.

Wednesday 23 May 2012

This product requires ASP.NET v2.0 to be set to ‘Allow’ in the list of Internet Information Services (IIS) Web Server Extensions


I’m currently performing a migration process and during the Moss installation the following error message is presented:

“This product requires ASP.NET v2.0 to be set to ‘Allow’ in the list of Internet Information Services (IIS) Web Server Extensions. If it is not available in the list, re-install ASP.NET v2.0.”
But on my machine Visual Studio 2005 and .NET2 are installed, so that’s a bit strange. Checking out the IIS extensions panel is indeed not showing the v2.0 version.
To solve the issue open your command prompt en navigate to:
%drive%\Windows\Microsoft.NET\Framework\v2.0.nnnnn
where nnnnn is the least significant version number of ASP.NET 2.0.
Now run the following command at the command prompt:
“aspnet_regiis.exe -iru -enable”
and the issue should be fixed.

Thursday 10 May 2012

Tracing\ Performance check up of sql queries


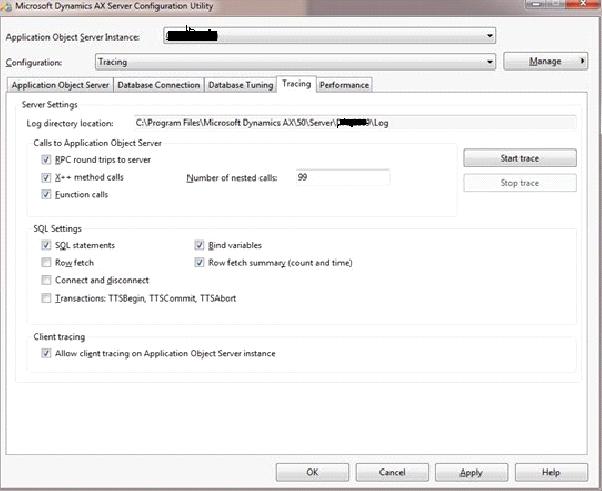
The tracing provides the user to identify the time consuming SQL Queries, transactions and different code that executes on AOS. The performance could be measured and unnecessary load and process can be identified and avoidable.
AX10.jpg
RPC round-trips to server :This lets user to trace all RPC round-trips from client to the server.
X++ method : The calls traces all X++ methods that are invoked on the server.
Number of nested calls : Limits tracing to the specified number of nested method calls.
Function calls : Lets the user to trace all function calls that are invoked on the server.
SQL statements : Lets the user to trace all SQL Server statements that are invoked on the server.
Bind variables : Lets the user to trace all columns that are used as input bind variables.
Row fetch : Lets the user to trace all rows that are fetched using SQL Server
Row fetch summary (count and time) : Counts all rows that are fetched, and records the time spent fetching
Connect and disconnect : This option traces each time the AOS connects and disconnects from the database
Transactions: ttsBegin, ttsCommit, ttsAbort This option lets to trace all transactions that use the TTSBegin, TTSCommit, and TTSAbort statements

Performance Analyzer for Microsoft Dynamics

The Performance Analyzer for Dynamics is a tool which collects data from several Data Management Views (DMVs) and enables to
  • Investigate Blocking
  • Investigate SQL statements
  • Investigate Indexes
  • Investigate SQL Server configurations
For more information on this tool visit this site at http://archive.msdn.microsoft.com/DynamicsPerf

Code Profiler

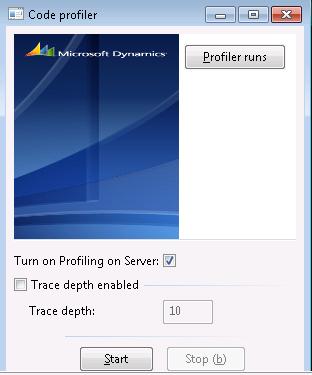
The code profiler is used to calculate the X++ code execution time and the database activity time. When you start a Profiler and stop after execution, the information is stored in the database with the RunID. When you click on the Profiler runs, it will show all the RunID's and the tasks which were executed.
cp1.jpg
To avoid unnecessary disturbance of several tasks and want to use it for just a special task, you could use the following code. To execute this sample code change the Table Name and Column Name.
// This is a sample to show how to use code profiler for a specific user task.
static void execCodeProfiler(Args _args)
{
// replace YourTableName with Original Table Name
    YourTableName tableName; 
    Counter counter;
    ;

// profile start point.
#profileBegin("Test of profiler")
    while select tableName
    {
    // replace ColumnName with the Orginal Column Name
    info(strFmt("Table name: %1", tableName.ColumnName)); 
    counter++;
    if (counter >= 10)
    break;
    }
#profileEnd
// profile stop point.

} 
Now you can see the Run ID and other information in Profiler runs screen, basically this type of scenario is used when checking the performance of the object by running several times and checking the duration result.
cp.jpg

Data Migration


SystemSequences in Dynamics AX help to assign different set of numbers to RECID on every table.
There are several methods of migrating data in Dynamics AX. I noticed some issues with the memory, performance and troubleshooting, as typically the memory is managed in Dynamics AX by Kernel (windows system dll).
There are migration tools which also assist in migrating, no doubt they are awesome. But the developers can still migrate data with out using any third party tools. This could be achieved by just using SSIS 2005/2008. This is a very powerful ETL tool which microsoft has already provided. The developers should only know few tricks to handle RECID's and then it is easy to pull data from any Source database and migrate to the Dynamics AX destination database. The developers need to create and sync the RECID number of a table with the NEXTVAL from SystemSequences.
Below is the sample T-SQL code to know the next RECID number for a particular table. The ID of a table can be identified from the table properties.
--The below TSQL code will help to know the next RECID number for a Particular table.

DECLARE @TableIdNumber varchar(150) 
SET @TableIdNumber = 1   -- This ID Number belongs to [Address] table and is provided as a sample.

Select Convert(Varchar(50),NextVal) NextRecID from SystemSequences where name = 'SeqNo' and tabid = @TableIdNumber   
There are few list of ID's provided in the above excel sheet. Test the above code in SQL Server.
Note : Dynamics AX 2012 only supports SQL Server 2008.
These following tables are very important since these are not specific for one module. The entire Dynamics AX depends on these tables and they are used in every module.
VendGroup table contains definitions of all Vendor Groups.
VendTable table contains vendors information for accounts payable.
CustGroup table contains definitions of all Customer Groups.
CustTable table contains the list of customers for accounts receivable and customer relationship management.
DirPartyTable contains all Address of Customers , Vendors and etc, this is also know as Global address book.
The table DirPartyTable contains all the entries in the Global address book. The Global address book stores all the persons and organizations information which are used through out the system.

Using .NET framework directly in X++


This facilitates the developers having knowledge of the .Net Framework. They could use them directly in X++ to enhance the custom features in Dynamics AX.
static void main(Args args)
{
//  System.DateTime is from .Net Framework
//  This is a sample to show how the Framework can be used along with X++ coding.

    System.DateTime     now;
    str                 getDateStr;
    ;
    
    now = System.DateTime::get_Now();
    getDateStr = now.ToString();
    info("It is now : "+getDateStr);
}  
Developers could also develop and use the custom DLL's designed in Visual Studio 2008. In order to use the Custom DLL, it should be copied to the Dynamics AX installation path 'Client\Bin' folder. Adding references in Dynamics AX to those custom DLL's you can start using them in X++. The default path of deploying the new .Net DLL is as follows
[DRIVE]:\Program Files\Microsoft Dynamics AX\50\Client\Bin
Note : Dynamics AX 2012 only supports the higher version Visual Studio 2010 and .Net Framework 4.0.

Execute Stored Procedure from X++ code


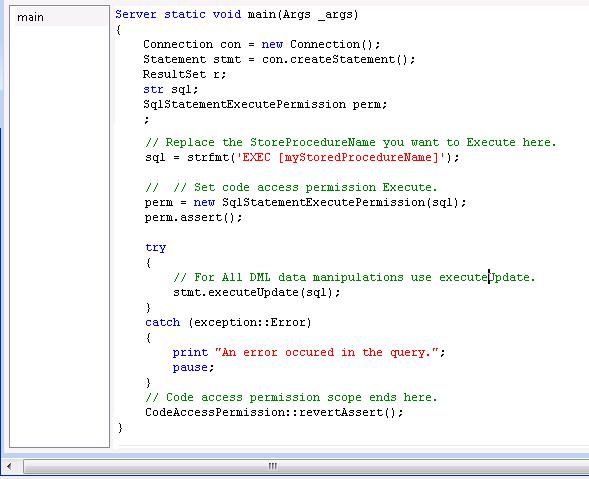
To execute a stored procedure from X++ use the Server method, the Client method does not have permissions. Following is the screen shot of the code from Server method. you don't require any special privileges or permissions to execute a stored procedure. if used other then Server method, a message should appear like this 'Request for the permission of type 'SqlStatementExecutePermission' failed.'
AX4.jpg
create a job and write the above code as shown in the image.
When creating a table from AOT in Dynamics AX, developers often forget to right click and save the table, specially the developers habituated to SQL Server. There could be column names conflict if not saved in AOT and eventually the changes might be lost and cause other problems.
Note : If creating a table from AOT in Dynamics AX then there will be couple of default columns added to your table like RECIDRECVERSIONDATAAREAID and etc. Make sure to include and insert values into those fields.

Execute external database Stored Procedure from X++ code using ODBC connectivity

This is to show a method to execute external database stored procedures from X++ code. Create a job in AOT with following code. Follow the steps as explained here in the code like replace Server Name, Database name , Stored Procedure name. The below code is executed through the ODBC Connection.
static void execExternalDatabase(Args _args)
{
    LoginProperty loginProperty;
    ODBCConnection odbcConnection;
    Statement statement;
    ResultSet resultSet;
    ResultSetMetaData resultSetMetaData;
    Counter counter;
    str sql;
    SqlStatementExecutePermission perm;
    ;

    loginProperty = new LoginProperty();
    loginProperty.setServer("SERVERNAME Here"); // Replace your Database Server Name here

    loginProperty.setDatabase("DemoDB"); //Replace your Database name here
     
    odbcConnection = new ODBCConnection(loginProperty); // setting odbc connection here.

     // ODBC Connection to create Statement
     statement = odbcConnection.createStatement();

    // Replace the StoredProcedure you want to execute.
    sql = strfmt('EXEC [myStoredProcedureName]');

    // Set code access permission to Execute
    perm = new SqlStatementExecutePermission(sql);
    perm.assert();

    try
    {
    // if Stored Procedure has Select query use executeQuery method.
       resultSet = statement.executeQuery(sql);
       resultSet.next();
       resultSetMetaData = resultSet.getMetaData();
        for (counter=1; counter <= resultSetMetaData.getColumnCount(); counter++)
        {
            switch (resultSetMetaData.getColumnType(counter))
            {
            case 0,1 :
            info(resultSet.getString(counter));
            break;
            case 3 :
            info(date2StrUsr(resultSet.getdate(counter)));
            break;
            }
        }
    }
    catch (exception::Error)
    {
        print "An error occured in the query.";
        pause;
    }

    // Code access permission scope ends here.
    CodeAccessPermission::revertAssert();
   }  
Used a simple select query in the stored procedure and the result will be displayed on the infolog.

Data Consistency Check Framework in Dynamics AX 2009


The consistency check framework consists of classes with names ending in "ConsistencyCheck."
The consistency check in Dynamics AX validates only the predefined list of tables for each module. This ConsistencyCheck framework is heart of Dynamics AX. Unfortunately there is no much documentation available online on these topics. The intention is to provide some basic details about these classes.
SysConsistencyCheck Class is the base class which is extended by several classes in different modules. All the classes which are extending it override the run method. In which they specify the relevant table names related to the modules, they are checked by the kernelCheckTable or kernelCheckRecords methods. For more information on theSysConsistencyCheck class and its methods refer online documentation at the following link athttp://msdn.microsoft.com/en-us/library/aa674688(v=ax.50).aspx
To run the Consistency check go to Basic > Periodic > Consistency check
SysConsistencyCheckJob Class which helps in running and scheduling the Consistency check batch jobs.
The following are ConsistencyCheck classes from Dynamics AX 2009 which gives information about the class hierarchy and the configurations to which they belong.
Class NamesParent ClassConfiguration Key
SysConsistencyCheck
SysConsistencyCheckJob
SysSecurityConsistencyCheck
BankConsistencyCheckBank
CustConsistencyCheck
CustConsistencyCheck_BOECustConsistencyCheckCustBillOfExchange
CustConsistencyCheck_LinkTableCustConsistencyCheckLogisticsBasic
docuConsistencyCheck
HRConsistencyCheck
EmplConsistencyCheckHRConsistencyCheck
CommissionConsistencyCheckHRConsistencyCheckCommission
InventConsistencyCheckLogisticsBasic
InventConsistencyCheck_ForecastInventConsistencyCheck_Table
InventConsistencyCheck_JournalInventConsistencyCheckLogisticsBasic
InventConsistencyCheck_OnhandInventConsistencyCheck_TableLogisticsBasic
InventConsistencyCheck_SetupInventConsistencyCheckLogisticsBasic
InventConsistencyCheck_TableInventConsistencyCheckLogisticsBasic
InventConsistencyCheck_TransInventConsistencyCheck_Table
SalesConsistencyCheckSysConsistencyCheckLogisticsBasic
VendConsistencyCheck_LinkTableVendConsistencyCheckLogisticsBasic
ReqConsistencyCheckSysConsistencyCheckReq
JmgConsistencyCheckJmg
JmgConsistencyCheck_dataJmgConsistencyCheckJmg
JmgConsistencyCheck_jobJmgConsistencyCheckJmgJob
JmgConsistencyCheck_payJmgConsistencyCheckJmg
JmgConsistencyCheck_setupJmgConsistencyCheckJmg
LedgerConsistencyCheckLedgerBasic
LedgerBudgetConsistencyCheckLedgerConsistencyCheckLedgerBasicBudget
LedgerConsistencyCheck_TransLedgerConsistencyCheckLedgerBasic
TaxConsistencyCheckLedgerConsistencyCheckLedgerBasic
CurrencyConsistencyCheckLedgerConsistencyCheckCurrency
PrintMgmtConsistencyCheck
BOMconsistencyCheckBOM
BOMConsistencyCheck_SetupBOMconsistencyCheckBOM
BOMconsistencyCheck_TableBOMconsistencyCheckBOM
ProdConsistencyCheck
ProdConsistencyCheck_JournalProdConsistencyCheckProd
ProdConsistencyCheck_TableProdConsistencyCheckProd
ProdConsistencyCheck_SetupProdConsistencyCheckProd
PurchConsistencyCheckProd
RouteConsistencyCheckProdRouting
RouteConsistencyCheck_SetupRouteConsistencyCheckProdRouting
RouteConsistencyCheck_TableRouteConsistencyCheckProdRouting
ProjConsistencyCheckProjBasic
ProjConsistencyCheck_ForecastProjConsistencyCheckProjBasic
ProjConsistencyCheck_InvoiceProjConsistencyCheckProjBasic
ProjConsistencyCheck_JournalProjConsistencyCheckProjBasic
ProjConsistencyCheck_SetupProjConsistencyCheckProjBasic
ProjConsistencyCheck_TableProjConsistencyCheckProjBasic
ProjConsistencyCheck_TransProjConsistencyCheckProjBasic
VendConsistencyCheck
VendConsistencyCheck_PNVendConsistencyCheckVendPromissoryNote
WMSConsistencyCheckWMSBasic
WMSConsistencyCheck_BOLWMSConsistencyCheckSalesShipments
WMSConsistencyCheck_JournalWMSConsistencyCheckWMSAdvanced
WMSConsistencyCheck_LocationWMSConsistencyCheckWMSBasic
WMSConsistencyCheck_PalletWMSConsistencyCheckWMSPallet
WMSConsistencyCheck_PickingRouteWMSConsistencyCheckWMSAdvanced
WMSConsistencyCheck_SetupWMSConsistencyCheckWMSBasic
WMSConsistencyCheck_ShipmentWMSConsistencyCheckWMSAdvanced
WMSConsistencyCheck_TransportWMSConsistencyCheckWMSPallet
WMSConsistencyCheck_WMSOrderWMSConsistencyCheckWMSAdvanced
WrkCtrConsistencyCheckWrkCtr

These are the ConsistencyCheck frame work classes for different modules in Dynamics AX 2009 being covered in the above list.
To know more information on the configurations to which they belong visit this link here.

Minor fix in the below class

LedgerConsistencyCheck class is responsible for validating the General ledger module.
LedgerConsistencyCheck class checks these following tables in the run() method.
List of Tables
  1. LedgerTable
  2. LedgerJournalTable
  3. LedgerTableAlternative
  4. LedgerTableAlternativeTrans
  5. LedgerParameters
  6. AssetLedgerAccounts (Missing)
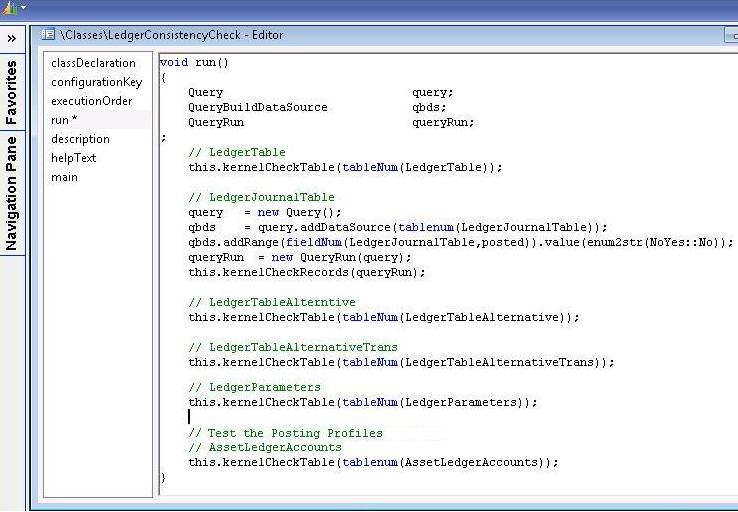
Add the AssetLedgerAccounts table to the LedgerConsistencyCheck class at end of its run() method as shown in the below image. The accounts for Fixed Assets in chart of Accounts hold references to the data in 'fixed assets in posting profiles'. By including the above table in the class will help to check and improve the data consistency.
AX2.jpg
The LedgerConsistencyCheck class should look like the above image in AX 2009.
Note : This above fix is not required in Dynamics AX 2012.

Fix for adding a new dimension in Dynamics AX


A very minor fix is required on the following SysDimensionAddWizard class to enhance the dimension functionality in Dynamics AX 4.0 and Dynamics AX 2009. This fix is not required for Dynamics AX 2012.
SysDimensionAddWizard class which runs the Financial Dimension Wizard, it is used for adding a new financial dimension to the system. Number of adding dimensions are controlled by Dynamics AX License key. Make sure you have sufficient licenses for the number of dimensions you are adding to Dynamics AX 2009, Since user defined dimensions are limited to seven.
Standard AX comes with the following three default dimensions:
  1. Department
  2. Cost center
  3. Purpose
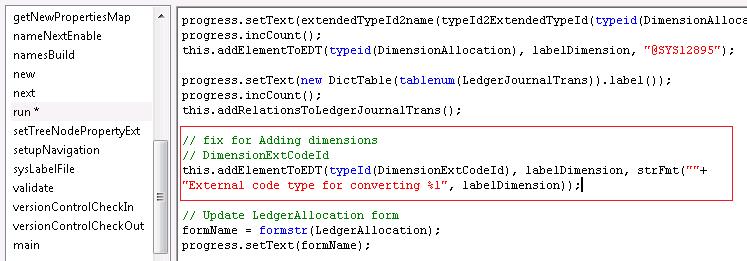
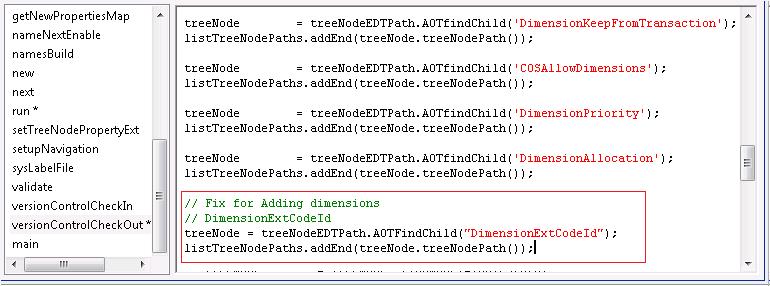
In SysDimensionAddWizard class changes are required in its run() and versionControlCheckOut() methods.
Add the code to run() method under the if statement as shown in the below image.DimAX1.jpg
Add the code to the versionControlCheckOut() method as shown in the below image.
DimAX2.jpg
After adding the above code, test by adding the dimensions.
Note: There's no limitation on creating user defined dimensions, if you are using Dynamics AX 2012 ,the above fix and code changes are not required.

AX Road map with layers and modules


Introduction

This article is intended primarily for intermediate Microsoft Dynamics AX users who are familiar with X++ andMorphX. The Goal of this article is to help the users by providing the tips and enhancements in the Dynamics AX.
Microsoft Dynamics AX (formerly Axapta) is one among the Microsoft Dynamics ERP primary products. Microsoft has a range of products under the Microsoft Dynamics umbrella (like Navision, Axapta, Great Plains, Solomon, Concorde, Point of Sale, Retail Management System, Customer Relationship Management and etc) that are more applicable for the small, medium and larger business organizations.
X++ is the language used to built Dynamics AX. MorphX is an integrated development environment in Microsoft Dynamics AX that allows developers to graphically design the GUI. MorphX allows access to application classes that are available in the application, by launching the X++ code editor. Microsoft Dynamics AX provides a set of Web sites that give you access to data through web forms which are collectively deployed and accessed from Microsoft SharePoint Enterprise Portal. The development could also be done using Visual Studio.Net.

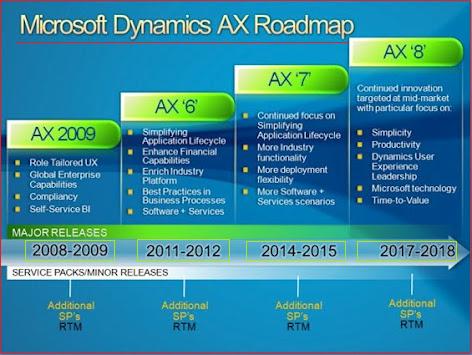
Roadmap

AXRoadmap.jpg

X++

X++ is an Object Oriented Programming language, also called OOP language. A class is a collection of methods. And subclasses are classes that inherit from other classes by using the keyword extend. In X++, a new class can only extend one other class, multiple inheritance is not supported. If you extend a class, it inherits all the methods and variables in the parent class (superclass).Subclasses enable you to reuse existing code for a more specific purpose, saving time on design, development, and testing. To customize the behavior of the superclass, override the methods in your subclass.

Modifiers

Static modifiers are often used in classes for methods which need to be accessed frequently.
Final Modifier will prevent the class to be overridden. A final modifier on the method similarly cannot be overridden by a subclass.
Abstract Modifier is exactly opposite to Final modifier. The use of abstract classes is a way to force inheritance to make the sub classes use the base class. It prevent the class being declared using new(). An abstract method must be overridden as an abstract method and cannot have a code block. Abstract methods cannot be static.
Display and Edit Modifiers : Usually these modifiers are not present in other languages, they just belong to X++. These modifiers are used in Forms and Reports to edit and display data in the user interface. For more information refer online documentation here http://msdn.microsoft.com/en-us/library/aa595058.aspx

Data Layers

Dynamics AX consists of sixteen application object layers that contain all the elements in the AOT.
Here are descriptions of the application object layers in Microsoft Dynamics AX 2009:
USR – User – Individual companies or companies within an enterprise can use this layer to make customizations unique to customer installations.
CUS – Customer – Companies and business partners can modify their installations and add the generic company-specific modifications to this layer.
VAR – Value-Added Reseller - Business partners use this layer, which has no business restrictions, to add any development done for their customers.
BUS – Business solution - Business partners develop and distribute vertical and horizontal solutions to other partners and customers.
SL1-SL2-SL3 – Certified solutions – Partners certified under the Microsoft Dynamics Industry Solution (MDIS) program distribute their solutions in the SL layers.
HFX – Hotfix – The Dynamics AX team delivers critical hotfixes using the HFX layer.
GLS – Global solution – The Dynamics AX Global Development and Localization team provides a set of GLS layers that contain country-specific functionality for regions in which Dynamics AX is released.
SYS – System – This is the lowest model element layer and the location of the standard Dynamics AX application. Only Microsoft has access to the element definitions at this layer.
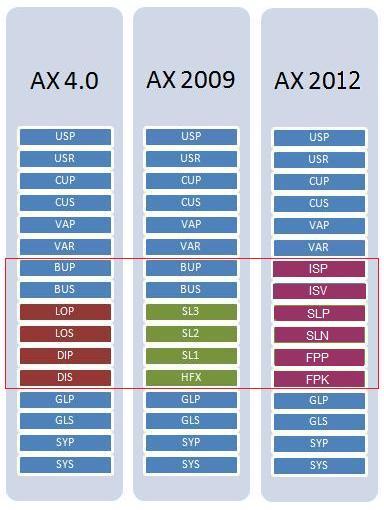
The layer-based application object files (AOD files), Some of them have been renamed with a new prefix in different versions of Microsoft Dynamics AX as shown below in the following image.
AX_layers.jpg
The four layers DIS / DIP / LOS / LOP from Microsoft Dynamics AX 4.0 have been renamed to HFX / SL1 / SL2 / SL3in Microsoft Dynamics AX 2009.
The six layers DIS / DIP / LOS / LOP / BUS / BUP from Microsoft Dynamics AX 4.0 have to be renamed to FPK / FPPSLN / SLP / ISV / ISP in Microsoft Dynamics AX 2012.
AX 4.0 LayerAX 2009 LayerAX 2012 Layer
axbup.aodaxbup.aodaxisp.aod
axbus.aodaxbus.aodaxisv.aod
axlop.aodaxsl3.aodaxslp.aod
axlos.aodaxsl2.aodaxsln.aod
axdip.aodaxsl1.aodaxfpp.aod
axdis.aodaxhfx.aodaxfpk.aod
The six layers HFX / SL1 / SL2 / SL3 / BUS / BUP from Microsoft Dynamics AX 2009 have to be renamed to FPK /FPP / SLN / SLP / ISV / ISP in Microsoft Dynamics AX 2012.

Modules

There are some functions which have been separated to another modules. Below are the few comparisons to show the new modules added in Microsoft Dynamics AX 2012.

AX 2009 ModulesAX 2012 Modules
General LedgerGeneral Ledger
Fixed Assets (New)
BankCash and bank management
Accounts PayableAccounts Payable
Procurement and sourcing (New)
Accounts ReceivablesAccounts Receivables
Sales and Marketing (New)
Inventory ManagementProduct information (New)
Inventory and warehouse management
Expense managementTravel and expense management
ProductionProduction control
ProjectProject management and accounting
Compliance and internal control (New)

The user interface in Microsoft Dynamics AX 2012 has been changed to be simpler and user friendly at all levels.